
Showing posts with label Craft. Show all posts
Showing posts with label Craft. Show all posts
Wooden Country Snowman

You can create a cute country snowman by using a 2x4.
Approximate Time: 25 minutes
Supplies:
- scrap wood, including a 2x4
- black, white, and orange crafter's acrylic paints
- sandpaper
- hot glue gun
- table saw
- small piece of fabric
- small piece of floral berry sprig
- paintbrush
Instructions:
- First cut a section of 2x4 about 12 inches long.
- Then on one end cut the corners to create an edge for the hat, they do not have to be perfect corners.
- Sand all edges of your 2x4.
- You will need 2 small pieces of wood about 2 inches thick, these can be scraps from other projects.
- Cut one piece about 6 inches long, this will become the snowman's hat brim.
- The second piece will be his nose, cut this piece approx. 4 inches long with one corner cut slightly to create the carrot tip.
- Sand all edges.
- Now you are ready to begin painting.
- Once the pieces have dried, you can lightly sand the paint to create a distressed country look.
- Next paint on the eyes, mouth, and add a little color for his cheeks.
- Attach the hat brim and nose by using a hot glue gun.
- Add a little white paint to the nose and hat brim for snow.
- Attach some berries and a homespun bow.
A quick and easy project!
Scarecrow and Pumpkin Candle Holders
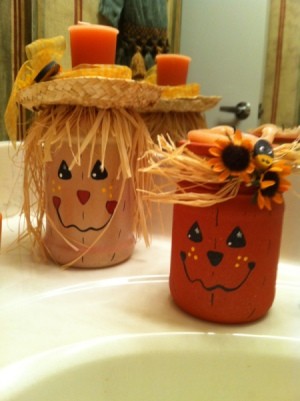
This is NOT my picture!
Recycle jars into scarecrow candle holders.
Approximate Time: less than 1 hour, excluding drying time
Supplies:
- jars with lids - assorted and clean
- spray paint
- paint or permanent markers for face
- scraps of fabric
- artificial flowers
- straw hat (hole in top)
- raffia, yarn, or paper for hair
- glue
Instructions:
- Spray paint a clean jar and the lid with a flesh colored paint (or orange for pumpkin) and allow to dry.
- Glue the lid on to the top of the jar, upside down. This will hold your votive candle.
- Draw or paint a face on the jar and allow to dry. Triangles work for eyes and a squiggly line is perfect for the mouth.
- Spray with clear spray paint to prevent chipping when you store this for the season.
- Glue hair to the jar just below the lid. Use a rubber band to hold in place and allow to dry.
- Decorate the straw hat using artificial flowers, ribbon, or a tiny crow.
- Affix the hat to your jar, hiding the hair line.
- Add a scented candle.
Be Careful! This is very flammable, so do not leave candle unattended. Or you can use a battery operated candle.
How To Dry And Clean Acorns For Crafting
Just as with pine cones, acorns need to be washed and debugged before using in crafts. The process is simple:
- Fill a bowl of acorns with water then rinse them one by one and scrub with a nylon scrubber or toothbrush (if needed). Examine each and toss those that have small holes drilled through the shell (indicates the presence of insects).
- Pat each dry then arrange on a foil lined baking sheet. Let them dry for about an hour then preheat the oven to 350°F.
- When the oven is ready, place the baking sheet on the middle rack. Bake for approximately 10 minutes, stir with a wooden spoon and bake for another 10 minutes.
- After 20 minutes remove from the oven and allow to completely cool before using in crafts.
- http://tipnut.com/acorn-crafts/
Fall Acorn Basket

This is NOT my picture!
Paint a woven basket brown then hot glue acorns around the bottom (both with and without caps). Fill basket with florist’s foam, fruit and Fall foliage.
bhg.com
Acorn Wreath

This is NOT my picture!
Hot glue acorns to a styrofoam wreath form then finish as you like (spray paint or keep it natural). Hang with ribbon.
littlethingsbringsmiles.com
DIY Acorn Necklace

Call me a nut, but I’m in love with acorns!
I’ve been collecting them from my husband’s grandparent’s yard every Sunday and I plan to use them in my Fall decorating. They are just so cute! I also saw some beautiful handmade necklaces on Etsy that I completely fell in love with! {here, here, and here.} Then I was thinking about making my own.. I was looking around for some cheap supplies, then I bumped into this post on how to make your own necklace from a real acorn! So I jumped off the couch and picked out the cutest acorn in my collection!

I started by gently removing the cap

Next I wanted to gut my little acorn, so I took my corn on the cob prongy holder thing and poked holes around the circle on the top of the acorn. Then I used my knife to cut out the circle, and then used one side of my scissors to dig the nutty stuff out and hollow out my nut.. that’s alot of nutty goodness inside one little acorn!


After the acorn was hollowed out I pulled apart a cotton ball into a bunch of tiny shreds, squirt a drop of hot glue inside the acorn, then squished in a couple pieces of the cotton with my prong-y cob holder. I did this a couple of times till I got the hollowness filled. I’m not really sure why I did this part.. Maybe it will keep it from getting gross inside.. haha.. don’t know.

Now I wanted to paint my acorn!


I thought a pretty bronze-y shimmer would be pretty, and I have this glittery shimmer eyeshadow I found at the dollar store. I never use it because the color doesn’t look good on me. At first I dry brushed on the eyeshadow, but when I brushed on mod podge after that, the shimmer kind of wiped away and disappeared. So I did it again and tried spraying Krylon’s clear spray instead of brushing, but it kind of blew all the shimmer off! … Needed another plan!

I mixed the shimmer eyeshadow with some clear nail polish and used my little paint brush to apply it to the acorn. Had to work quickly because the polish was drying fast!

It worked!
And I just clear coated the top with a brush on clear paint I had.

Then I glued a jump ring to the acorn cap. I used a dab of E6000 and a dab of hot glue.. The hot glue to hold up while the E6000 dried. I thought E6000 would be stronger. I plan on painting the glue spot brown to match the cap so it’s not very visible.

And now I have my own handmade Fall time acorn necklace!

We took a walk last night and bumped into a couple with a wagon full of puppies, and they were the SWEETEST puppies ever! They were a mix of Shihtzu and Poodle, making them Shihpoodles! I held a couple of them and one tried to eat my acorn necklace! haha!{I’m definitely getting a Shihpoodle puppy when we’re able to have a pet!}

Such a fun little craft and would be perfect for gifts! And how cool that I had everything I needed on hand! Love when I find those kinds of projects!!
Happy Almost Fall Time!!!!
A Dryer Sheet Sachet...
The following pics are NOT mine!
http://sewmanyways.blogspot.com/2012/08/sew-sew-saturdaydryer-sheet-sachet.html
Please visit her website for the full set of directions with a picture tutorial.


Save all those dryer sheets and these will be a quick and easy project you can make in an assembly line style. Just sew, fill, staple and tag!!!
Great for...
*

http://sewmanyways.blogspot.com/2012/08/sew-sew-saturdaydryer-sheet-sachet.html
Please visit her website for the full set of directions with a picture tutorial.


Save all those dryer sheets and these will be a quick and easy project you can make in an assembly line style. Just sew, fill, staple and tag!!!
Great for...
- teacher gifts
- grandparent gifts from the kids
- quilting bee friends
- to add to the top of a gift
- add to a gift basket of real tea things
- add to bridal shower gift if you are buying sheets or bathroom towels
- party favors
- party favors for a tea party
The list is endless. Have fun with it!
*

Shower Caddy Gift-Wrap Organization
 Found this on Pinterest.
Wall-mount a shower caddy for the perfect gift-wrapping center. Store cards and stationery on the shelves. Attach ribbon to a mesh container and hang it from one of the hooks to store pens and pencils. Rest wrapping paper on the bottom shelf and hang scissors from a hook.
It was also here;
http://www.bhg.com/decorating/storage/projects/clever-unexpected-storage-solutions/#page=3
Cereal Boxes Mail Organizers
Please visit the site to learn more about this idea.
http://www.imaclevermama.com/2011/07/recycled-cereal-box-mail-organizer-tutorial/
Photo below is NOT mine!

Get all the instructions from the site listed above.
http://www.imaclevermama.com/2011/07/recycled-cereal-box-mail-organizer-tutorial/
Photo below is NOT mine!

Get all the instructions from the site listed above.
Use shoe box li...
Use shoe box lids covered in fabric for artwork. This project is so easy, and much cheaper than buying canvases.
Please visit the site for more ideas and info. http://sbfirsthouse.wordpress.com/
The photo below is NOT mine!

Please visit the site for more ideas and info. http://sbfirsthouse.wordpress.com/
The photo below is NOT mine!

Ladder Bookshelf

Okay, so ya'll get the idea. Take one or two wooden ladders, level them on the wall and attach well with brackets. I got this idea from Pinterest.
Here's a few ideas for brackets you could use.


The possibilities are endless with the type bracket you can use to hang your "bookshelf" with.
Recycled Water Bottle Into Fashionable Jewelry!
http://www.recycled-fashion.com/2010/12/diy-bangles.html
Please visit her site for more info and ideas!
Photos below are NOT mine!
 Yep, a plastic bottle. This is not the actual plastic bottle I used, because I forgot to take a 'before' photo before I cut it up into sections..
 And cut to shape...
 Thrifted material from the op-shop..
 Cut and machine stitched, with some leftover lace in-between the layers..
 Turned inside out (the stitching and shearing on the inside) leaving a gap to thread the plastic bottle base through, and blanket stitched by hand once inside..

An easy, cost effective, recycled bangle, made in less than 15 minutes!

Please visit her site for more info and ideas!
Photos below are NOT mine!


Can you guess what I used to make my bangle? Well, the base of it is made from this:
 Yep, a plastic bottle. This is not the actual plastic bottle I used, because I forgot to take a 'before' photo before I cut it up into sections..
 And cut to shape...
 Thrifted material from the op-shop..
 Cut and machine stitched, with some leftover lace in-between the layers..
 Turned inside out (the stitching and shearing on the inside) leaving a gap to thread the plastic bottle base through, and blanket stitched by hand once inside..

An easy, cost effective, recycled bangle, made in less than 15 minutes!

Subscribe to:
Posts (Atom)